deets #5 (part 5) a new hope

so i poked around on the internet and i found out that the best solution to my problems is to lie. the guitar lied to me about being made out of nice wood. so i lie to the world by replacing the veneer and saving the day. you have to buy these things in huge 4x5 sheets and they're like $60. i asked the guy for something smaller and he said that no one does that. he was really an ass. "who would buy a 2x2 sheet of this stuff?" he said, like a complete ass.


me, asshole, me. i would. the world would. now i got all this extra veneer, but whatever. guys at lumber yards are dicks because they know you've been to home depot and every other place in the city and they're your last resort. they've got you by the balls and they know it. so here it is. like paper. 


i got this thing home and cut it down then realized i didn't know how i was going to glue this thing on. the answer was contact cement after like 4 hours online. so i get the contact cement and begin. 


everything went smooth. the veneer is holding. i look like a hero.  


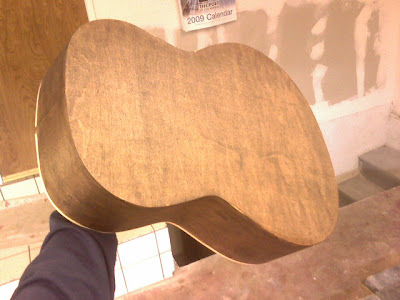
i applied the veneer to the back as well. threw some new binding back on, and stained in the classic dark walnut.  


it's not as pretty as the original veneer but it looks better then what i had to begin with. one battle at a time i guess. 


so next we have to take care of the neck. i can't wait to see how i screw that up. 

deets #5 (part 4) failure

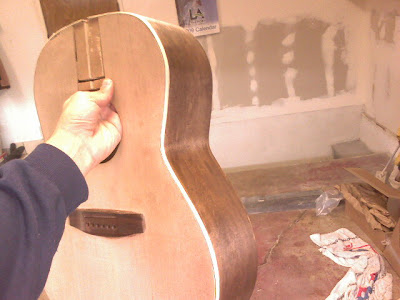
so now with the binding in place, i've sanded the whole thing down so i can blend in the new wood with the old wood. 


i didn't know that the sides were plywood based with a veneer glued on top. i sanded right through the first layer and hit the plywood. i figure it wont be such a big deal. 


went to baller hardware and picked out some nice dark walnut stain to bring this to life. plus i figure the dark stain will cover up my mistakes. 


boy, was i wrong. the top looks great, but the sides look like ass. it's much better in the picture. in person, it's ass. 


i tried sanding all the veneer off to just have an even surface to sand. no good. the plywood is to thin and it's absorbing the stain very inconsistently. this looks like a boy scout had at it with a dull hatchet. this would get me laughed right out of this years namm show. 


i'd like to say right now that before this, the only thing i've ever stained were my pants. i feel like a failure. but there has to be a way out of this. it has to look better than when i got it. that's my mission statement. i'm actually going to go online and research this. it's on. 

deets #5 (part 3) gluing

i've done all i can with this guitar and now we glue this monster back together. i only own a few clamps and a real guitar builder would not be proud at this sad display. 


heres a closer look at the new wood. not too shabby. 


here is susan. she inspects everything i do. i sanded down the sides of the guitar. i figured it would be easier to reapply stain than trying to match the old one. 


susan is now examining the new deeper binding channel that i cut. 


susan also really likes binding. here we are working as a team. 


here she is waving to the camera.


almost done. i use the glue and tape method.  


and here she is all taped up. now we wait for the glue to dry. 


working on a dream (part four)

just wanted to share pictures of working hard in the studio. here we have a bunch of knobs that make things sound better or worse. it's all up to you. or sometimes you just stare at this and do nothing for like 13 hours at a time waiting for an idea to hit you.


here is where i've been spending my time. you can't see it in the picture but we keep the room at a solid 98 degrees. it's like a sweat lodge. the heat makes us have these visions of spirit animals and then the spirit animals tell us what to do next. sometimes when i reaching over to a knob i swear to god that my arm looks like a huge wing. like an eagle's. then i know i'm on the right path.


this is a picture of carlos and i having what's known as a waking nightmare. we sit still but our minds are racing. we are in deep contemplation.


when the mix is just right i always seem to cry out of exhaustion and through the sheer beauty of what we have created. coming off this is always difficult. some say you should eat more meats during this part because it raises the dopamine that your brain naturally loses during mixing. others say orange juice. but for me it seems that you just have to go through it.


mixing is filled with pain and sadness and sometimes it takes years before you can listen to something you've mixed. it takes a long time to heal those wounds.

deets #4 (part 8) headstock binding

headstock binding, once reserved only for royalty, is now within my reach. here's a brief history on it.... in olden times god would choose a king, the king would appoint a woodworker to make a sweet guitar with headstock binding, the king would have sex with his own family to preserve the bloodline and the guitar would be passed through the ages. it's hard to believe but it's true. the headstock binding is a symbol of status and commands respect.

so here we have a few pieces of purfling, which is a fancy term for really small pieces of binding. here we have a classic black and cream going on.


these are really small and a pain in the ass to handle. here's the clamp and glue method. clamp that piece and crazy glue those guys together.


so here we are gluing this in. as you can see the headstock has a few steps to it. the smaller one is for the purfling and the larger one is for the binding.


and here it is with the binding installed. the classic cream/black/cream is going to wow them and the namm show this year.

working on a dream (part 3) editing

a little update on the 'CMG & we are the night' record. i put the old recording chart to bed and it's been replaced by the editing chart. the editing chart looks the same as the recording chart, but they are much different. it's like a rock advent calendar of rock. when this new chart fills up then it's over. my goal is to have it done by the new year. this record will not follow me into the new decade.


deets #5 (part 2) fixing a hole

so i think i figured out a plan for this guitar that had been kicked a new one.

wood!

but don't try to find wood at home depot. they laughed me out of the store when i told them i needed wood like .008" thick.

i found this little piece in an architecture store. i guess they use it to make sweet models.


i have no idea what i'm doing but i figured out i needed some back support. is this true? i don't know? i glued little pieces of wood to the back of the side. no one will ever see this nightmare once the guitar is finished so i'm going for it.


so here are those little guys peeping out. they will help support our replacement wood.


next i ran around the house and found this curling iron. it goes all the way up to 400 degrees. we're going to use this to bend this wood into shape.


i took the wood and soaked it in hot water for like 5 minutes. then while it was wet, i used the curling iron to create steam. the steam loosens the fibers and magically allows it to rearrange itself. when it dries it'll keep it's shape.


i clamped the piece onto the otherside of the guitar while it was drying to keep it from straightening out.


after that dried i took it to the grinder and shaved off the excess and sloped the edges down with a file to match the slopes i made on the guitar. it's all looking pretty good.


so i glued the hell out of this thing. and i also clamped the hell out of this thing. then i set some weight on top of the parts i couldn't get to with the clamp.


i would like to say again at this point that i have no idea what i am doing. now we wait for the glue to dry.

wrapping a drum part four

ok. so i let the glue dry hard. let my tape bond together. now we move on to drilling all the holes out of this thing. i was nervous, thought about matt, went ahead and drilled. look at these perfect holes.


went the the music store and bought some new heads. i'm not a drummer so this was my first time buying heads, or as i like to call them, skins. ask the drum guy at the store one question about drums and you're there for an hour. got home, put the hardware back on, slapped the skins on and boom!


the side view is looking nice. you could eat off of this thing. oh snap, check the chrome son!


double damn!


so anyways, it's done. i put it back into the closet and i won't see this thing for like a year. maybe i'll invite matt over.


the end.

the secret service - oh susie

pardon my french, but holy crap. the secret service wrote the perfect song back in 1979 and then made the perfect video. they are swedish and according to this video, awesome at roller skating. i don't come across gems like this everyday. this sounds cooler than any band from brooklyn, ever. bring it back sweden.


wrapping a drum part 3

so now that we have the shell sanded and looking fine, i'm doing a mock wrapping to see what's up. make my measurements and cut the excess off. i'm leaving enough overlap for the double sided hi-bond tape that's going to seal the seam.


when you get your measurements, clamp the center of the wrap onto the drum. this way we can glue in two parts and have the correct alignment the whole time.


i'm going to use regular wood glue for this satin finish because the vintage wraps were thinner and they will discolor and warp if you you use bonding cement like they use for today's modern wraps.


i can't show you and pictures of the gluing because it was too crazy to take pictures of. but i'm sure you get the picture. thin layer of glue on every inch of the paper, roll out the air bubbles and then seal it with hi-bond tape. i clamped the overlay together for some extra hold. i almost cried during this part thinking about what matt said to me over the phone.


after it dried a bit i started to shave down the excess with a sanding dremel bit. you're not supposed to sand the wood shell at all so be careful.


after that, the old school method is to file the wrap down so it never catches on anything. this takes a long time, but i wanted to impress the old schoolers.


the next post will be the last about this crap.

deets #4 (part 7) putting in fret markers

so now that we have our binding glued in, it's time to add a little extra magic. fret markers! i always thought they were drawn on, but it seems they are small straws of plastic that need to be fit in. so here i am drilling out some small holes in the binding.


here are a few empty holes and a few filled holes.


then we cut the excess of and scrape it down with that bad ass knife, and there you have it. fret markers.


deets #4 (part 6) neck binding

my cream neck binding came in the mail today. what joy. it's just plastic. it's really going to bring this neck back from the dead or kill it for good.


the first thing i did is fire up a bowl of boiling water and stick it in. i'm not sure how bendable this stuff is so i figured it would help to melt it. i have to bend it into the shape of the neck. but melting sucked and it was better to bend it the way it was. plastic is incredible.


here i am trying to get the bend just right. it wants to fight you but you got to keep fighting back.


then you got to get some superglue and start gluing and clamping. glue and clamp. glue and clamp.


i really can't believe this was so easy. it looks pretty already.


then came the scraping. binding will not fit perfectly so you have to shave it down with some sort of knife or razor. i found this bad ass knife in the garage and it looked pretty tough. i cut myself about 4 good times and there is blood all over the wall and the bed for some reason. sounds like a typical weekend for mike kevich. just trying to see if you're still reading this mike.


so here it is all nice and leveled on the top, just a few more touches and we're done.


till next time....